This hands-on guide explains how to build a machine learning model using a drag-n-drop interface in Microsoft azure ml studio. Azure Ml is a very intuitive tool to run ml experiments without any programming and it turns out a very fast approach to solve a real-world problem using Machine Learning.
ML Model Cycle
There are mainly 5 phases envolve in an ml model creation process. We’re going to build a model for the classification of iris flowers from sepal and petal dimensions.
So let’s understand each phase and how to implement them in azure machine learning studio.
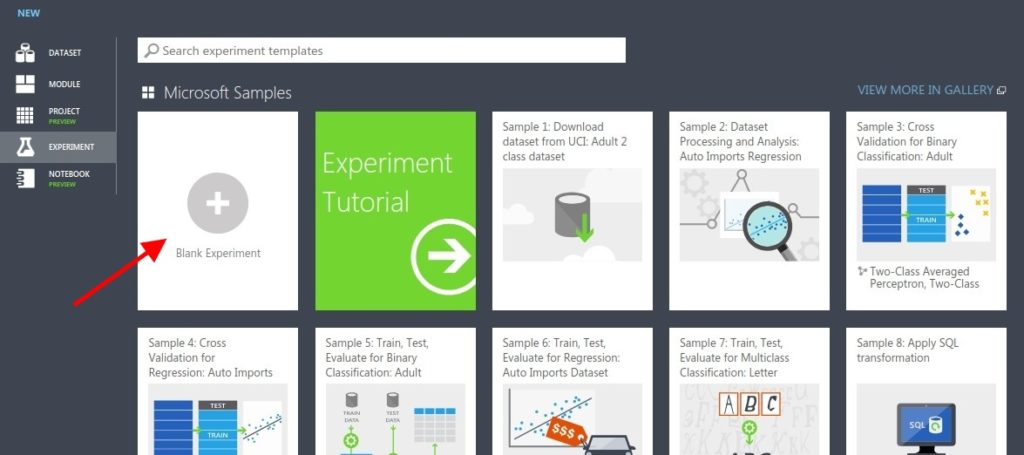
Go to the Microsoft Azure Machine Learning portal and log in with your credentials. Go to the Experiments page in the main menu and click on Add Icon at the left side at the bottom. It’ll show a gallery of Microsoft Experiments. Choose the Blank Experiment to start from scratch.
Step 1 – Load Data
Data is a primary asset while creating any machine learning model. It can be a large CSV file or stored in the database or hosted on a cloud server. IRIS dataset is already hosted on azure so we’re going to use that.
Type iris in the search experiment items search box in the left side section. You’ll see Iris Two Class Data sample under the Saved Datasets. Hold the mouse on the item and drag it to the dataset placeholder in the middle section.
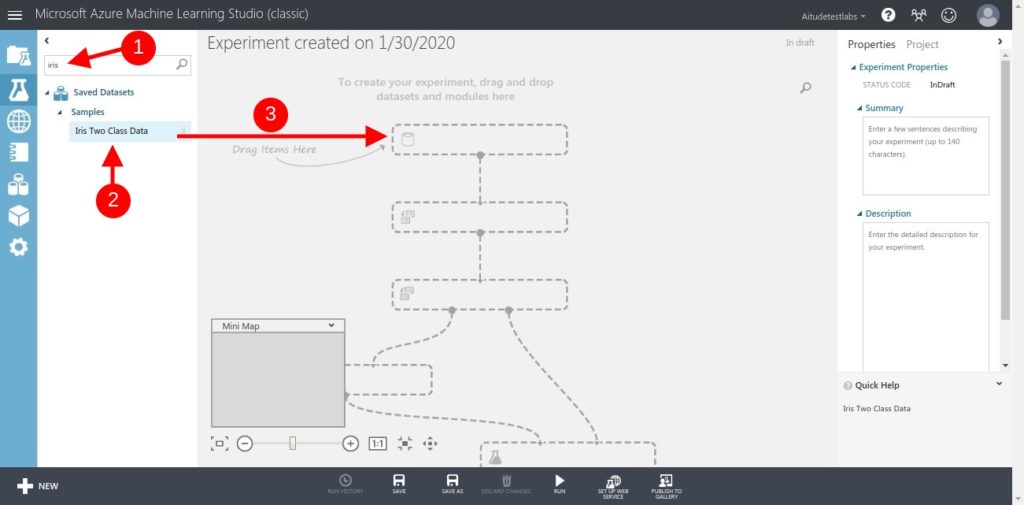
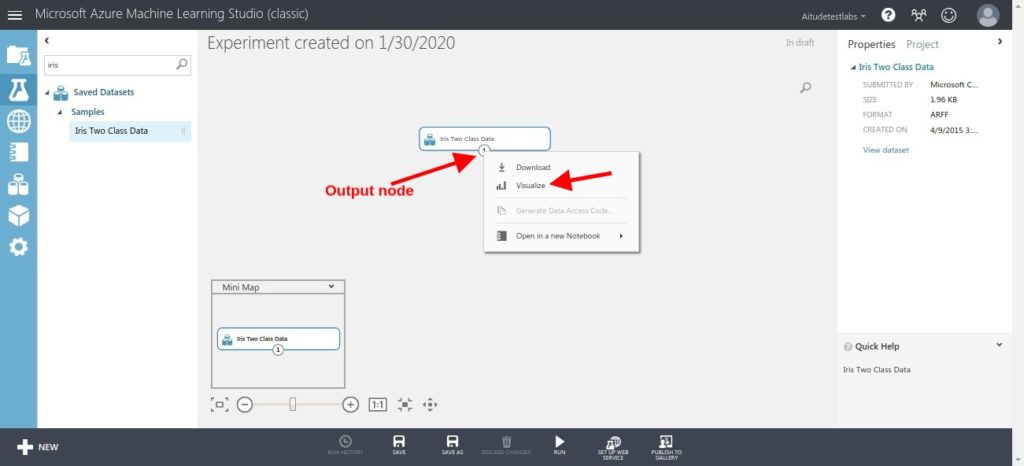
This way you can search the dataset and use it in the experiment. To visualize the dataset, click on the output node and then select Visualize.
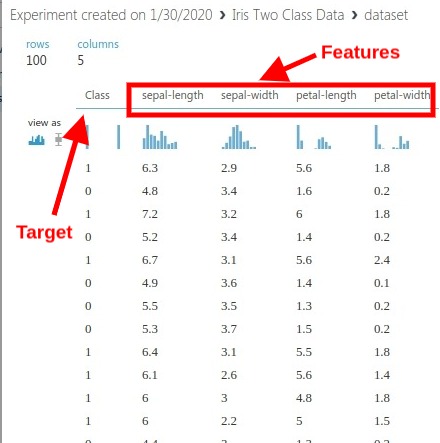
This dataset has a total of 5 columns. The class column is a target column and others are Features column.
Step 2 – Data Pre-Processing
Most of the time data are in raw format and need manipulations to get ready for the training. Azure has a large number of modules to apply data manipulation. Just type in the search box and available modules will be listed. e.g To handle missing data, type missing in the search box and Clean Missing Data module will be available in the Data Transformation section.
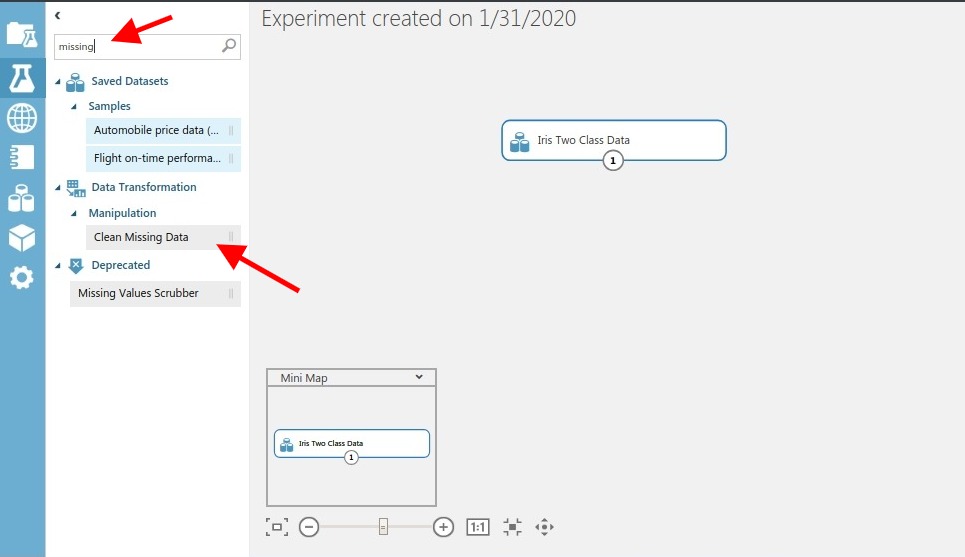
Iris dataset has no missing values and columns datatype are also fine so we need not use any module in this step.
Step 3: Features Engineering
In this step, we create new features from the raw dataset which makes a model good in performance. This step has a huge impact if done correctly. For example, If we have a timestamp column, we can extract hour, time, day of the week, month and year and make them as new columns.
e.g Type feature in the search box and Filter Based Feature Selection module will be available in the Feature Selection section.
In the iris dataset, we have 4 features which are core features of iris flowers so sufficient to identify the class and no need any feature engineering step.
Step 4 – Build the Model
It’s time to choose the right algorithm to predict the flower class. So first identify if it’s a regression or classification problem.
- Regression Problem – We predict a value based on features. e.g automobile price based on vehicle properties.
- Classification Problem – We classify the data among a set of pre-defined categories.
So this problem is a classification problem for this experiment. We have a label associated with the features so we’ll use the Supervised Machine Learning algorithm. We can use the Decision Tree Supervised Machine Learning algorithm to solve this problem. You may choose any other classification algorithm as well.
Split Data
First, we’ll split the dataset into two parts: training and test datasets. The training dataset will be used to train the model and the test dataset will be used to evaluate the trained model.
Type Split in the search box and drag the Split Data module. Set the fraction of rows in the training dataset (80%) and test dataset (20%). And connect the output node of Iris Dataset to the input node of Split data.
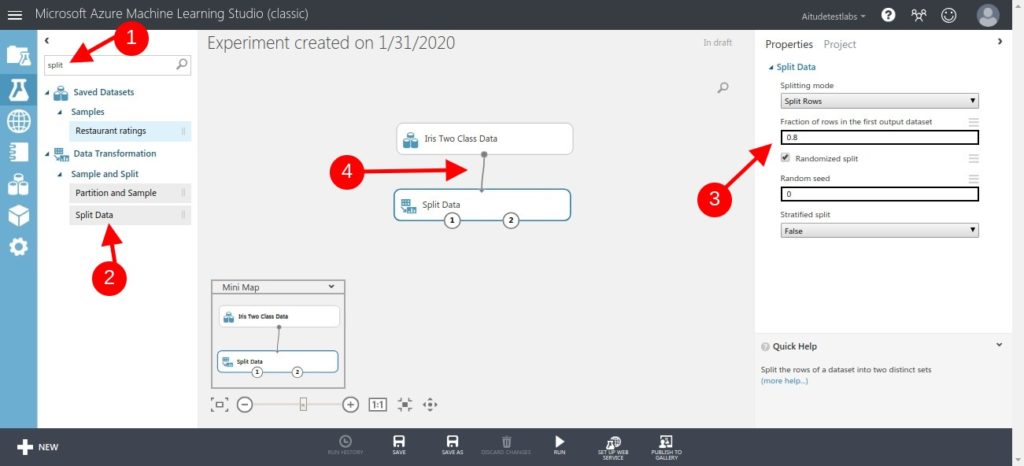
Choose Model
Type Decision in the search box and drag the Two-Class Boosted Decision Tree module. You may change the settings on the right side but for now, keep the default.
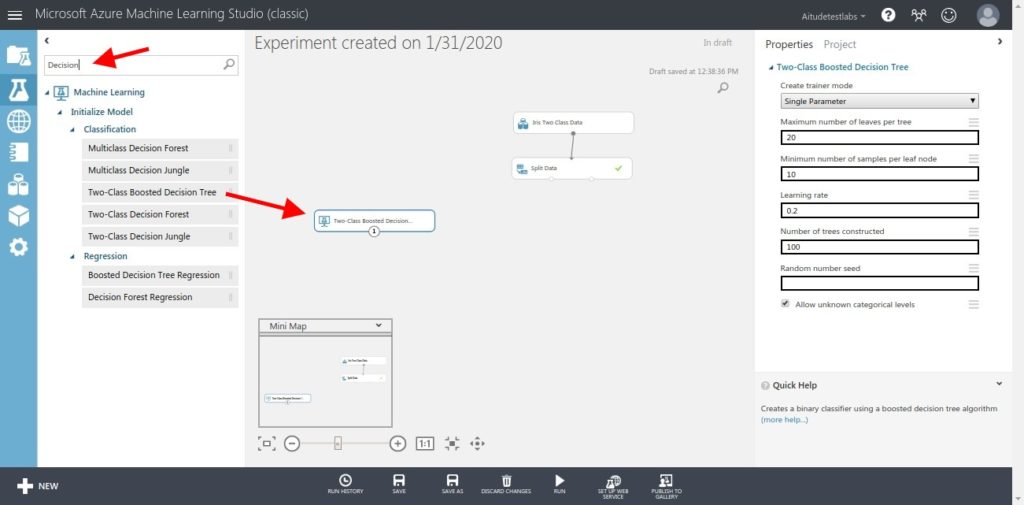
We need to use a Train Model module to connect both the training dataset and the Decision Tree algorithm. Type Train in the search box and drag the Train Model module. There are two input nodes so connect the first one to the Decision Tree module and the second one to the first output node of the Split Data module.
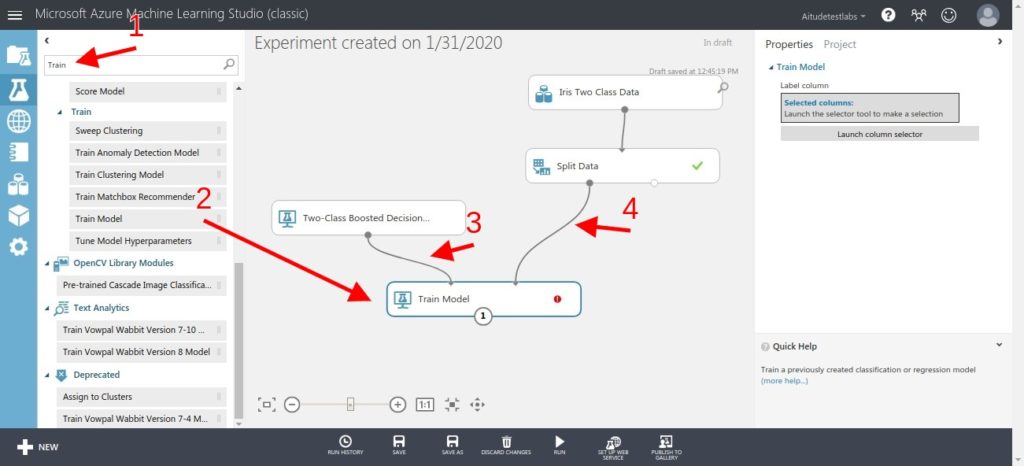
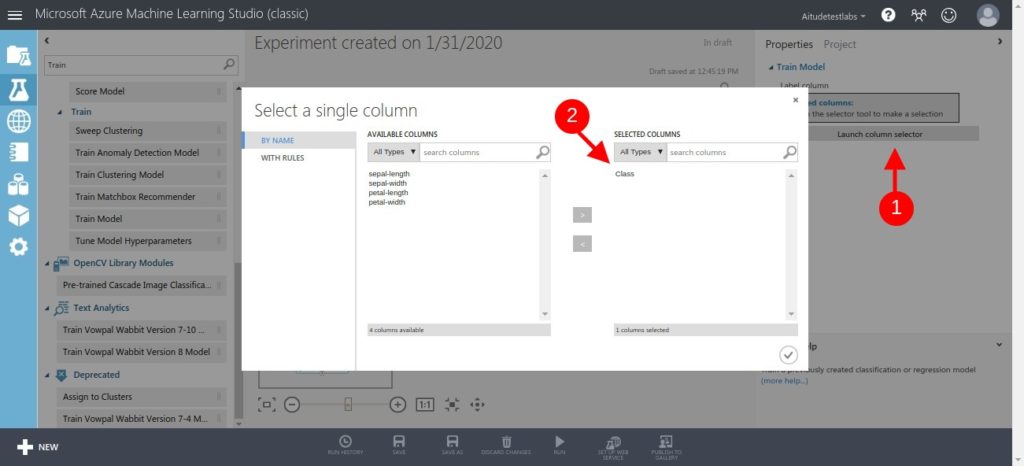
Now we need to specify the target column. So click on the Launch column selector button on the right side and select the Class column as a target column. And click on the Apply button at the right bottom.
Step 5: Evaluate Model
The aim of this step is to check the accuracy of the model on unseen data which were not included in the training dataset. And that’s why we split our dataset into two parts: training and test.
Test Model
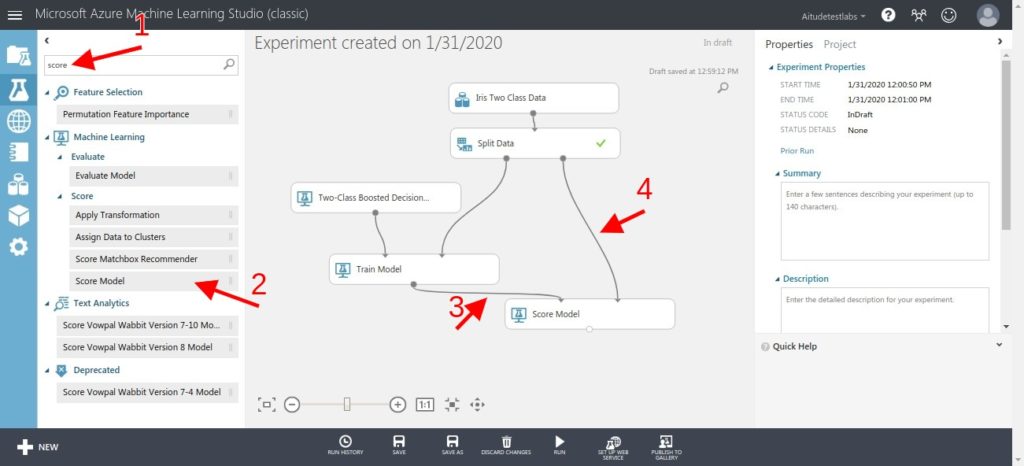
Type Score in the search box and drag the Score Model which has two input nodes so connect the first one to the output node of the Train Model module and the second one to second output node of Split Data module.
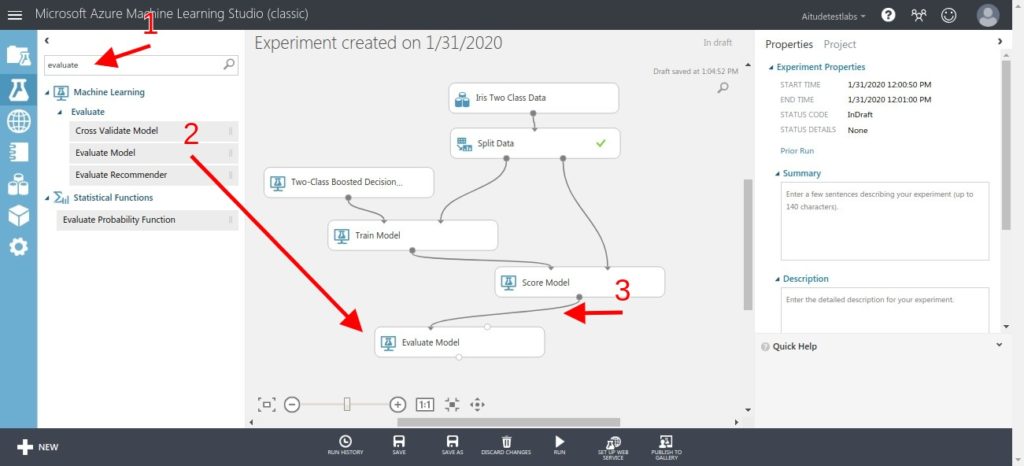
The last thing is to evaluate our model performance so use the Evaluate Model module for this. Type evaluate in the search box and drag the Evalute Model. And connect it to the Score Model module.
Run Azure Experiment
Once we have taken the above 5 steps of building a Machine Learning Model, run this experiment and check the accuracy. Go to the bottom of the middle section and click on Run.

It can take some time because each module will be executed and output will be passed to the next connected module. Each module will indicate execution status at the end of the corner.
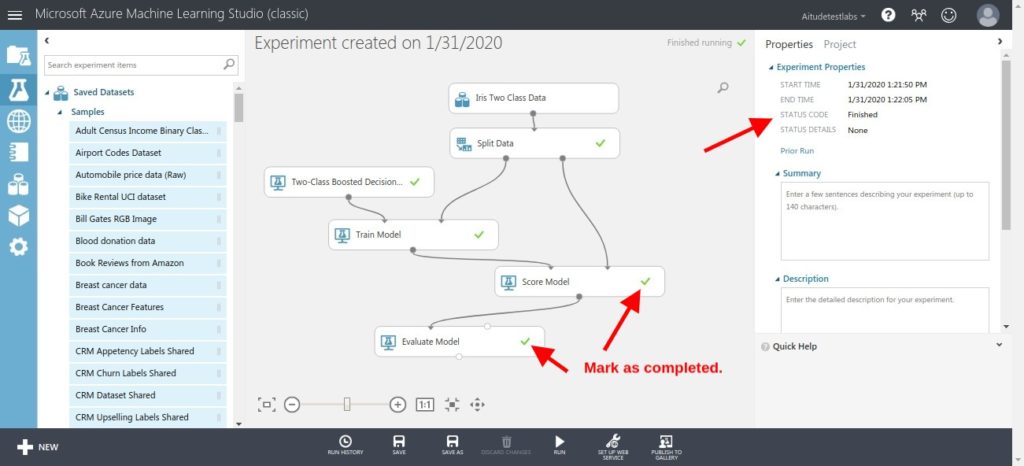
To visualize the evaluation metrics, right-click on Evaluate Model and mouse over on Evaluation Result and click on Visualize as shown below :
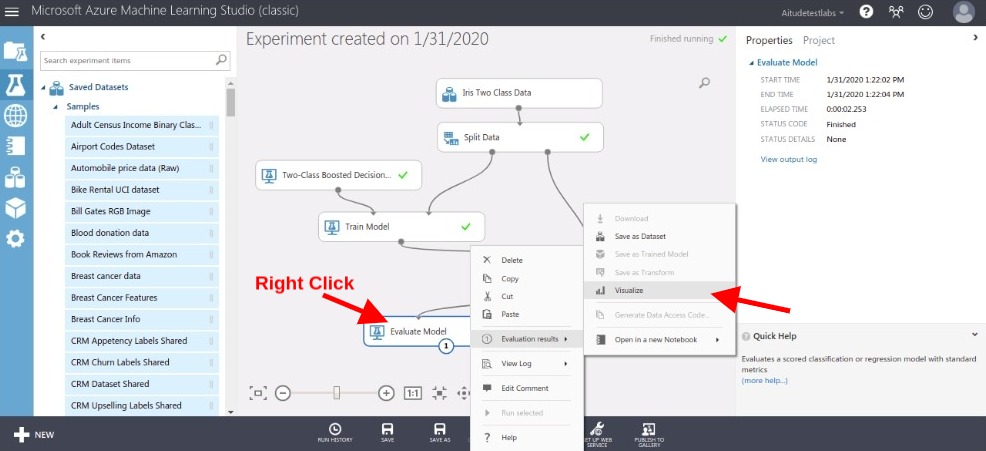
or you can click on output node of the Evaluate Model module and click on Visualize.
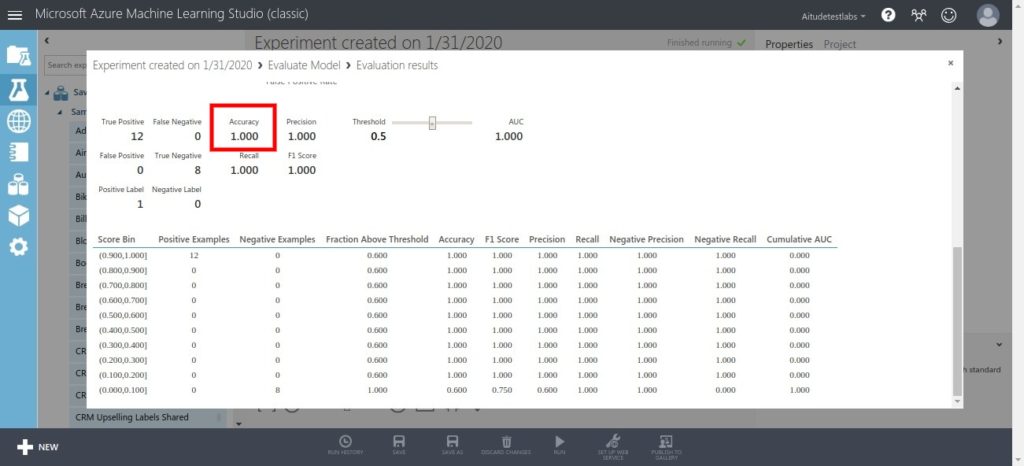
It shows a number of statistics related to model performance and it depends on the model you choose. So here ROC curve, Accuracy, Precision, F1 score, and many other statistics are shown. So our accuracy is 1.00 which is the ultimate goal of any machine learning model.
We have gone through all steps to create a simple machine learning model. Now you’re ready to build for your awesome machine learning model.

